Yesterday Microsoft Windows NT Server version 3.1 had his 30 years anniversaryon July 27, 2023.
At that Time I was working for a Computer Broker as an IT technician, working with IBM mainframes like
System 36 and AS/400 with PC connections and going from OS/2 to Microsoft Windows NT.
The biggest change was Microsoft Windows NT 4 Server and Windows NT 4 Workstation making small networks and
Enterprise Datacenters here in the Netherlands. Doing early Beta programs with Windows Server 2000 and Windows 2003 Server instead of Windows NT 4 in production. In the Netherlands we made one of the first Microsoft Windows 2008 R2 Hyper-V Clusters in the Datacenter with Blade Server Technology to virtualize almost every physical Server.
Doing Upgrades to Windows Server 2012 R2 and making the first connection with Microsoft Azurewith a System Center Data Protection Manager (DPM) 2012 R2 and Azure Vault. At this time lot of companies are doing migrations from Windows
Server 2012 R2 to Windows Server 2019 or Windows Server 2022. Or they are innovating to the Microsoft Azure Cloud. Microsoft Azure Stack HCI Clusters is a New way to work Hybrid with Azure Cloud technology.
As a Microsoft MVP for Cloud and Datacenter Management and Windows Insider MVP, I work every day with Windows Servers
in Datacenters and now also in the Microsoft Azure Cloud. What I really like is the Microsoft Windows Server Insider Program
Here you can test the Newest Microsoft Windows Server Insider Preview Builds from the Windows Server product group and give your opinions / ideas and Feedback on the new features in Windows Server but also in Windows.
You can build your own Test Lab like I did in Microsoft Azure with Virtual Machines:
Windows Server 2022 Insider Preview Datacenter Azure Edition Build 25379
Here you see my Azure Virtual Machine with Windows Server 2022 Insider Preview Build Azure Edition.
More information about Microsoft Windows Server Azure Edition is here
Today it’s a Hybrid Cloud World to get the benefits of Microsoft Azure Cloud together with your on-premises DataCenters.
You can connect your Windows Servers with Microsoft Azure Arc agent for central Cloud Management features, Security with
Azure Defender for Cloud, Azure Monitor and Log Analytics. Here you find all the Microsoft Azure Arc Service docs.
I’m really curious about the future of Microsoft Windows Server in a world where you have Azure Open AI
Microsoft Technology is going fast, but I really liked the 30 years I worked with Microsoft Windows Server and the
Product Groups also with the Windows Insider Program Team 🙂
Going for the Next 30 years of Microsoft Windows, Server, Clusters, and Containers
GitHub has become the central location for open-source projects, samples, and even content – but primarily focused on developers. This new repository will focus on you: The ITPro/Ops person managing the environment in your company, keeping the lights on, supporting end-users or other IT teams.
The Microsoft Modern Infrastructure Cloud Advocates are responsible for the content on this repo, but sharing your handy script samples on this repo would be Awesome to manage Modern Azure Infrastructure, Azure Stack HCI, Windows Servers, Hyper-V, Containers and more. Have a look at the announcement on Microsoft tech community, Sharing together to make IT Better 😉
I like to thank you Community for Supporting, Sharing and Reading New Microsoft technologies on my Blog, Twitter, Facebook and
LinkedIn Community Groups 💗 I wish you all happy Holidays, Merry Christmas and a Healthy New Year 2023 may the Best Wishes comes true ! 🎄🥂
I’m very proud and Honored on the Microsoft Global MVP Awards 2022-2023 !
MVP Award for Cloud and Datacenter Management
MVP Award for Windows Insiders
MVP Award for Azure Hybrid
Thank you Microsoft Product Groups, MVP Award Program, Windows Insider Team, Azure Hybrid Team, Windows Server and Azure Stack HCI Team for all your support, NDA PGI sessions, and for the Awesome software, Features, solutions you are building 🙂
Wish you all Happy Holidays, Merry Christmas and a Healthy New Year 2023 may the Best Wishes comes true ! 🎄🥂
Here are some Great links for Reading and Sharing :
JOIN these LinkedIn Community Groups for free and Share New Microsoft Technologies Together:
To keep your Business running, It’s important to secure and monitor your data. One of the security measures is doing Vulnerability assessments in your datacenter(s) to see the status and results for remediation. With Microsoft Azure Arc Defender for Cloud you can do a SQL Server vulnerability assessment in your on-premises datacenter or anywhere with the Azure Arc agent running. Here you find more information about Azure Arc enabled SQL Server
Microsoft Defender for Cloud on Azure Arc enabled SQL Server
Here I activated Microsoft Defender for Cloud on Azure Arc enabled SQL Server, and Azure Defender for Cloud is doing a SQL vulnerability assessment to get the security status and results for remediation.
On this same Azure portal page you will see the Vulnerability assessment findings.
When you Open a Vulnerability finding, you get more information and the remediation for the issue.
Here you see the complete Resource Health of the Azure Arc enabled SQL Server.
Look at the Status of each severity.
Here you see all the vulnerability findings on these four databases.
When you do the remediation you will see the healthy status.
on the Passed tab.
Here I open only the OperationsManager database.
Now you see only the Vulnerability findings on this database.
Here you see a vulnerability finding on the SCOM database with the Remediation 🙂
You can make your Own Workbooks or use them from the Gallery.
Workbook example of Vulnerability Assessment findings.
Conclusion
With Azure Defender for Cloud vulnerability assessment and management you will learn a lot to set your Security Baseline on a higher level in your datacenter(s). Getting the right remediation of Microsoft to solve security issues is Great! You can do your assessments frequently to show your current status on demand. I Really like these Azure Hybrid Tools to make my work easier and the data more secure for the business.
In the last blogpost of MVPLABSerie we learned how to add Servers from anywhere to Microsoft Azure Arc services to get the Azure Hybrid benefit with awesome features and Management tools. you can find that blogpost over here:
With Windows Admin Center in the Azure Portal you can manage the Windows Server operating system of your Arc-enabled servers, known as hybrid machines. You can securely manage hybrid machines from anywhere–without needing a VPN, public IP address, or other inbound connectivity to your machine.
Open Servers and open your Azure Arc Enabled Server.
First of all we have to add the right Role assignment.
Click on Access Control on the Left.
Click on Add => Add Role Assignment.
Here you have to add the following Role Assignment. Windows Admin Center Administrator Login. Add this to your account
When the account is done, then go to Windows Admin Center (Preview)
on the left panel. Click then on Setup.
Click on Install
Setup Successfully!
Now you can Connect your Azure Arc Enabled Windows Server.
Here we have my Storage Windows Insider Server in mvplab.local domain.
From here you can do your IT Management with WAC.
Remote PowerShell on Azure Arc enabled Server.
Microsoft Azure Arc Insights Monitoring and Log Analytics
For IT Management and troubleshooting, monitoring and getting Insights is important to act quickly to keep the business and IT solutions running. With Azure Arc Insights you can see with Maps the connections of the Windows Server.
Azure Arc Insights with Map.
See also the Quick Link to Connection details
This is a really cool overview of your connections.
Here you can see if you have a Malicious connection!
Here I do a Query on the Arc Enabled Server mvpstore01 Update Summary.
There are a lot of Log Analytics queries to play with and mark them as your favorite for your Arc enabled Windows Server 😉
In the following blogpost we will have a closer look at Microsoft Azure Auto Manage and Update Management Center for
Microsoft Azure Arc enabled Windows Servers. We will not forget Security with Azure Defender for Cloud coming in the next blogposts.
Conclusion
With Microsoft Azure Arcenabled Servers you get a Microsoft Azure Hybrid environment with Great features and solutions.
Some features are still in preview and not supported for production workloads, but you can test them now like I do with my mvplab.local
This new innovative technology is going fast forward for Azure Hybrid Services to Manage your Windows Servers, Azure Stack HCI Clusters or your Linux virtual Machines. Azure Arc rocks and you can connect Microsoft Azure Anywhere 🙂
In this blogpost of MVPLAB Serie, we are going to install Microsoft SQL Server 2022 CTP2.1 on my Windows Server Insider Preview Cluster in mvplab.local domain. Before this blogpost I installed the following basics in mvplab.local domain :
Now we are going to install the Backend of the datacenter, and that is SQL Server 2022 CTP2.1 on a Cluster resource with the first SQL Instance for databases which is High Available (HA).
SQL Server 2022 Preview is the most Azure-enabled release of SQL Server yet, with continued innovation in security, availability, and performance.
Integration with Azure Synapse Link and Azure Purview enables customers to drive deeper insights, predictions, and governance from their data at scale.
Cloud integration is enhanced with disaster recovery (DR) to Azure SQL Managed Instance, along with no-ETL (extract, transform, and load) connections to cloud analytics, which allow database administrators to manage their data estates with greater flexibility and minimal impact to the end-user.
Performance and scalability are automatically enhanced via built-in query intelligence.
There is choice and flexibility across languages and platforms, including Linux, Windows, and Kubernetes.
Mount the ISO file and Copy the files to a local disk location, then run Setup as Administrator with your personal Domain Administrator Account to install SQL Server 2022 CTP2.1. Before the installation read Configure Cluster accounts in Active Directory (AD)
Click on Yes.
Click on the left on Installation Then Click on New SQL Server Failover Cluster Installation
Here I choose for the Developer edition.
Click on Next
Accept the License terms
Click on Next
Check for Updates (recommended)
Click on Next
Check the Warnings and solve issues.
Click on Next
I Installed only the default for SQL Database.
(You can install later Shared SQL Features if you need them.)
Click on Next
Specify a network name for the New SQL Server Failover Cluster. mvpsql01 Click on Named Instance and type INSTANCE01 Click on Next
Click on Next
Select your Cluster disk
Click on Next
Select IPv4 and type the IP-Address of your Cluster Resource
mvpsql01
Then Click on Next
Select your domain Service accounts and type the passwords. Select if you want Maintenance Tasks privilege to your SQL Server Database Engine Service.
Click Next
Here you can add the SQL Admin Group from Active Directory (AD)
Click on top tab Data Directories
I Changed the User Database Log Directory.
Here you can set your directories.
Have a look at the Other TAB fields, I set Memory later. When you finished all the Tabs then click Next
Check the Summary and click on Install
SQL Server 2022 CTP2.1 Installed Successfully Click on Close.
This was on the first mvpfs01.mvplab.local, now you have to do the installation on the other node mvpfs02.mvplab.local.
Here we will add a SQL Node to the Cluster.
Click on the left on Installation
Then Click on Add Node to a SQL Server Failover Cluster
Add Node in Progress
Add Node to SQL Server 2022 CTP2.1 Failover Cluster is Successful
Click on Close
Here you see your SQL Server 2022 CTP2.1 Cluster Instance Running in Failover Cluster Manager.
Connecting the High Available SQL 2022 CTP2.1 Cluster Resource Instance01.
And you can connect the SQL Instance with Azure Data Studio 😉
With Azure Data Studio you can install marketplace extensions working with your SQL Instance.
Here you find more information about Microsoft Azure Data Studio
In my last MVPLAB Serie blogpost, I wrote about setting-up a Microsoft Domain mvplab.local and making a Windows Server Insider Cluster with an iSCSI Target Host Server for Shared iSCSI Storage provisioning. First thing I did was Installing Windows Admin Center for Hybrid IT Management. With WAC we can Manage the Cluster Nodes but also the Cluster, Installing new features via Windows Admin Center like Kubernetes for running Containers and microservices. But first we start with Microsoft Cluster Aware Updating to keep your Cluster up-to-date.
Windows Admin Center Cluster Manager
Installing Cluster Aware Updating
In the following steps you can see how easy it is to install Cluster Aware Updating with Windows Admin Center on your Windows Server Cluster, in my case mvpcl01.mvplab.local
Go to your Windows Server Insider Cluster
In Cluster Manager, go to Updates.
Click on Add Cluster Aware Updating Role
Microsoft Windows Admin Center is the Administrator Management tool to use in your hybrid datacenter. You see how easy it is to configure Cluster Aware Updating (CAU) on your Cluster. When you use Windows Server Core or Azure Stack HCI then Windows Admin Center is really handy instead of command-line tools or PowerShell scripting. here you can find more information about Cluster Aware Updating requirements and Best Practices
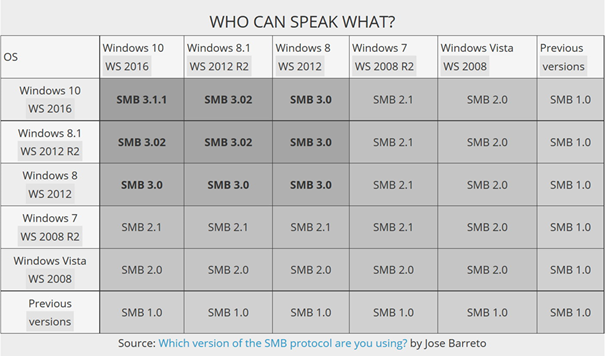
The Server Message Block (SMB) Protocol is a network file sharing protocol, and as implemented in Microsoft Windows is known as Microsoft SMB Protocol. The set of message packets that defines a particular version of the protocol is called a dialect. The Common Internet File System (CIFS) Protocol is a dialect of SMB. Both SMB and CIFS are also available on VMS, several versions of Unix, and other operating systems. Here you can see the versions of MS-CIFS and download free white papers
Today SMBv1 is a not save protocol and will be used by hackers for man in the middle attacks to compromise your data and systems. SMBv1 is a weak protocol and should not be used in your environment. There are still a lot of Windows Servers 2012 R2 in the world running in datacenters with SMBv1 by Default enabled. To make your Windows Server more secure, you can disable SMBv1 protocol via a Group Policy Object (GPO).
In the following steps we will disable SMBv1 on Windows Servers via GPO.
Open Group Policy Management in your Domain.
Click on Group Policy Object with your right mouse button.
Click on New.
Give your policy a Name.
I made also an temporary Exception policy.
Right click on your new Policy Object.
Click on Edit.
Go to Computer Configuration => Preferences => Windows Settings
Click on Registry.
Click on New and then on Registry Item.
Here you have to add the following Registry Properties:
Set these settings.
Set Path: HKLM:\SYSTEM\CurrentControlSet\Services\LanmanServer\Parameters
Click on Apply for these Registry settings.
SMBv1 Disable setting is set in the Policy Object.
This is the path where we push the policy via GPO.
Here we Link the Existing GPO to the OU with the Windows Server 2012 R2
to disable SMBv1 Protocol.
Select your new Policy to disable SMBv1 Protocol.
We have now Linked the new GPO to Disable SMBv1
GPUpdate /force on your Server to disable SMBv1
To get the new GPO active on your Server.
When the Server gets a reboot, SMBv1 will be disabled by GPO again.
When you have maintenance window for updates for example, you can un-install the SMBv1 Feature in Server Manager. This procedure needs a restart of the Windows Server.
Go to Server Manager remove features.
Click on Remove Roles and Features.
Remove the mark at SMB 1.0/CIFS File Sharing Support Feature.
Click on Remove.
Click on Close and Reboot the Server
Now SMBv1 protocol on the Windows Server is disabled and will use a higher version of SMB like version 2.x or 3.x.
SMB over QUIC introduces an alternative to the TCP network transport, providing secure, reliable connectivity to edge file servers over untrusted networks like the Internet. QUIC is an IETF-standardized protocol with many benefits when compared with TCP:
All packets are always encrypted and handshake is authenticated with TLS 1.3
Parallel streams of reliable and unreliable application data
Exchanges application data in the first round trip (0-RTT)
Improved congestion control and loss recovery
Survives a change in the clients IP address or port
SMB over QUIC offers an “SMB VPN” for telecommuters, mobile device users, and high security organizations. The server certificate creates a TLS 1.3-encrypted tunnel over the internet-friendly UDP port 443 instead of the legacy TCP port 445. All SMB traffic, including authentication and authorization within the tunnel is never exposed to the underlying network. SMB behaves normally within the QUIC tunnel, meaning the user experience doesn’t change. SMB features like multichannel, signing, compression, continuous availability, directory leasing, and so on, work normally.
Client Server Handshake and Data transfer differences.
When you still have Windows Servers running with SMBv1 by default enabled, for security you should disable SMBv1 protocol as soon as possible! Otherwise you make it easy for hackers to compromise your data with man in the middle attacks. In Windows Server 2019 and higher SMBv1 is disabled by default. Have a look at SMB over QUIC in your test environment and learn how secure it is and how it works for your security and data.