Cloud and Datacenter Management Blog

Microsoft Hybrid Cloud blogsite about Management


Leave a comment

#Microsoft Azure Migrate Assessments in Action #VMWare to #Cloud

Azure Migrate

This blogpost is about the Microsoft Azure Migrate tool in the Cloud doing Azure Migrate assessments to see if your on-premises Datacenter is ready for Azure Cloud Services. Before you migrate your workloads with Azure Migrate to the Microsoft Azure Cloud, you want to know the costs before the migration and what your options are in the transition. For example when you have hardware in your on-premises Datacenter which is too high qua hardware specs like Memory, CPU and storage and you can do with less Compute power, then the performance assessments are really interesting. From here you see a step-by-step guide for VMWare workload assessment(s) to Azure Cloud.

Azure Migrate preparation for VMware workload

When you search for ‘Azure Migrate’ in your Azure Subscription and click on the services you will see the Azure Migrate Overview screen. When you don’t have a Microsoft Azure subscription yet, you can get one here

Click on Assess and Migrate Servers.

Before we go further with the server migration assessments for VMware, there are more Azure Migration tools available to do assessments and migrations like the following goals :


For Databases Microsoft Azure Migrate uses the Data Migration Assistant for the Assessment and the Data migration to Azure SQL Cloud.
The Data Migration Assistant (DMA) helps you upgrade to a modern data platform by detecting compatibility issues that can impact database functionality in your new version of SQL Server or Azure SQL Database. DMA recommends performance and reliability improvements for your target environment and allows you to move your schema, data, and uncontained objects from your source server to your target server.


To identify the right Azure SQL Database / Managed Instance SKU for your on-premises Database you can use the CLI with a Script :

Here you find more detailed information about the Data Migration Assistant

When you have a Virtual Desktop Infrastructure on-premises and you want to migrate to Windows Virtual Desktop (WVD) you can use this Azure Migrate tool :

ISV Lakeside with SysTrack

You can vote for the tools or scenarios that you would like to be integrated with Azure Migrate via this Online form

When you are in the beginning of your Cloud Transition journey, what will go first to the Cloud?

  1. On-premises mail to Microsoft Office 365
  2. File Server Clusters to Office 365 into Teams, Onedrive for Business
  3. From Apps On-premises to SaaS or Paas solutions
  4. From On-premises Websites to Azure Cloud Solutions like Azure Web App.
  5. From SQL Clusters On-Premises to Azure SQL Managed Instances in the Cloud
  6. And at last Migrate Servers to Azure IaaS

Of course there are much more scenarios like Lift and Shift or modernize your workload in the Cloud like moving to Azure Kubernetes Services for example instead of IaaS Virtual Machines.

So when you want to start moving your On-premises Website(s) or WebApp, Microsoft Azure Migrate Services has a tool for that too :

Assess any app with an endpoint scan. Download the Migration Assistant and start your .NET and PHP app migration to Azure App Service.

Click on Assess

and from here you can plan your migration.

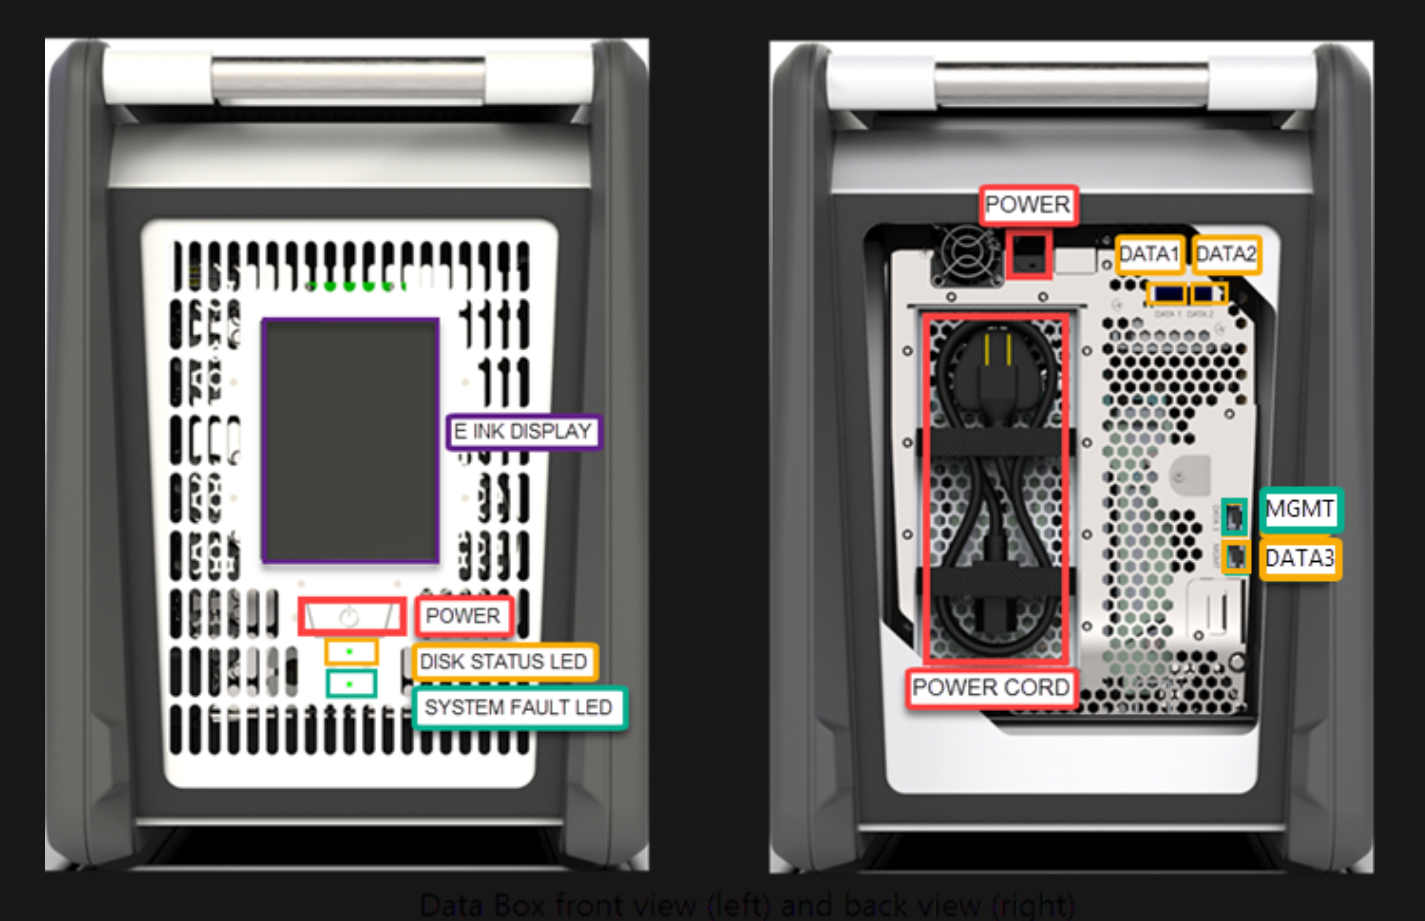
At last when you have to move a big enterprise On-premises Datacenter to the Azure Cloud with a lot of Servers for example 10.000, you can use Azure Data Box Migration
The Microsoft Azure Data Box cloud solution lets you send terabytes of data into Azure in a quick, inexpensive, and reliable way. The secure data transfer is accelerated by shipping you a proprietary Data Box storage device. Each storage device has a maximum usable storage capacity of 80 TB and is transported to your datacenter through a regional carrier. The device has a rugged casing to protect and secure data during the transit.

Azure Data Box

When you want to read more about Microsoft Azure Migrate go to the website.

Microsoft Azure Migrate assessment for VMware platform

First we make the Azure Migrate Project ready in the Microsoft Azure Portal.

Select the right Azure Subscription and Resource group to collect the metadata reported by your On-premises environment. Give your Migrate project a name and select the geography.

Here you can select from different Assessment Tools
Select Azure Migrate Server Assessment

Here you can select from different Migration Tools
Select Azure Migrate Server Migration

Add your Tools in the Azure Portal.

Here you see both Microsoft Azure Migrate tools for the Assessment and the Migration as well.
We are going for the Assessment quick start, so click on discover

From here we select with VMware vShere Hypervisor, so you can download the Azure Migrate Appliance for VMware ( 12GB Ova file).

You can also work with an Import CSV file but that’s Preview.

Now you can download and Install the Azure Migrate Virtual Appliance on VMware.
Follow the instructions here

When you have installed the Microsoft Azure Migrate Virtual Appliance for VMware successfully in your environment and has access to all the Virtual Machines then you can run the setup in the Appliance to make connectivity with your Azure subscription.

This will check all the prerequisites and get the updates.

Getting access to vCenter Server with the right permissions.

Now when your Azure Migrate Virtual Appliance for VMware is ready and collecting metadata, we see in the Microsoft Azure Portal the discovery running :

Discovery is in Progress.

After a view minutes we have discovered the Servers running on VMware platform On-premises.

Discovered Servers

Now we have the Servers in our metadata, we can do the Assessment(s) to get all the information we want for preparing to migrate to Azure Cloud Services. Click on Assess.

From here you give the Assessment a name and then you go to the properties of the assessment by clicking on View All

Here you can set the parameters for the assessment for example based on :

  1. Reserved instances
  2. Storage types
  3. Sizing criterion like Performance-Based
  4. Percentile Utilization
  5. Azure VM series to use
  6. Discount
  7. VM Uptime
  8. Offer pricing like Enterprise Agreement Support or Pay-As-You-Go
  9. Hybrid Benefit offer.

Here I made different Azure Migrate Assessment groups with different parameters to see the difference in Costs.

Here you see for example Migrate As Is On-Premises and Performance-Based, but also an Azure Migrate Assessment without SQL Cluster Nodes. In this way you can make your own Azure Migrate Assessment with all your Servers or just a view Servers of your On-premises solution which you want to Migrate to Azure Cloud Services.

Overview of your Azure Migrate Assessment

Server is ready for migration


Server Ready but with conditions

Microsoft Azure Migrate gives you all the information to make the right decisions to migrate you workload from VMware to Microsoft Azure Cloud. When the Azure Migrate Assessment(s) are ready you can make a CSV export file to check the information before you migrate.

Overview of the Azure Migrate Assessment

Azure Migrate Assessment based on Performance for the VM
and there is a separated tab for Storage.

When your assessment is done, you can do the migration by replicating them to Microsoft Azure.

Here you can see the Azure Migrate for VMware (Agentless) steps

More Microsoft Azure Feature resources :

Dependency mapping helps you to visualize dependencies across machines

Setup Agentless Dependency visualization for assessment (Preview) 

Assess the readiness of a SQL Server data estate migrating to Azure SQL Database using the Data Migration Assistant

Conclusion

Microsoft Azure Migrate gives you insight information about your own On-Premises Datacenter by doing assessments to get the right migration information to move to Microsoft Azure Cloud. It gives you Azure Cloud costs before you do any migration at all, based on Total Cost of Owner (TCO) ship you can calculate if your solution in the Microsoft Azure Cloud is cheaper or not. Realize that’s it is not always about the money but also :

  • Innovations
  • Time to market
  • New Features
  • Flexibility
  • Scalability
  • Availability
  • Not owning hardware anymore
  • Less management (Hardware)

Hope this blog post helps you by your transition journey to Microsoft Azure Cloud


Leave a comment

#Microsoft Azure Hub-Spoke model by Enterprise Design 2 of 4 Lift and Shift #Azure #Hyperv #VMware

Microsoft Azure Hybrid Cloud Architecture HUB-Spoke Model

Microsoft Azure Hub-Spoke model

This blogpost about Microsoft Azure Hub-Spoke model by Enterprise Design 2 of 4 “Lift and Shift” is part of a Datacenter transition to Microsoft Azure Intelligent Cloud. It’s talking about Azure Architecture, Security, Assessment, Azure Policy, and implementation of the design. Here you find the first blogposts :

It’s important for your business to have your Azure Architectural design with Security in place before you start your “Lift and Shift” actions, think about Identity Management and Provisioning, RBAC for your Administrators and Super Users with Two-Factor Authentication. Security with Network Security Groups and Firewalls 

Azure Multi-Factor-Authentication (MFA)

Microsoft Azure Hub-Spoke model : “Lift and Shift”


Microsoft Azure HUB subscription for “Lift and Shift”

To “Lift and Shift” to the Azure HUB Subscription we have the following in place by Design :

  1. Azure Scaffold and Hierarchy (Governance)
  2. Virtual Networks (VNET) with the Subnets and IP-Number plan
  3. ExpressRoute VPN Connection with a backup failover Site-2-Site VPN connection to Azure.
  4. Resource Groups, like Active Directory, ADFS Farm, Authentication, SQL Backend.
  5. Resource Policies
  6. Resource Locks
  7. Network Security Groups (NSG)
  8. DNS
  9. Azure Firewall
  10. Azure internal Load Balancers.
  11. Azure Storage Accounts
  12. Azure Virtual Machine sizes
  13. Azure Virtual Machine Image
  14. Managed Disks and Encryption.
  15. Redundancy for Virtual Machines
  16. Azure Key Vault for Encryption.
  17. Azure Recovery Vault ( Backup)
  18. Azure Policy
  19. Managed Identities, Azure MFA, RBAC,ADFS
  20. Azure Monitor
  21. Azure Naming Convention
  22. Azure Tagging
  23. Azure Cost Management
  24. ARM (JSON) Deployment template (for New requests)

To help you more with your Azure Virtual Datacenter have a look here


Azure Hierarchy

Azure Scaffold

When creating a building, scaffolding is used to create the basis of a structure. The scaffold guides the general outline and provides anchor points for more permanent systems to be mounted. An enterprise scaffold is the same: a set of flexible controls and Azure capabilities that provide structure to the environment, and anchors for services built on the public cloud. It provides the builders (IT and business groups) a foundation to create and attach new services keeping speed of delivery in mind. Read more hereI did the “Lift and Shift” between quotes because it’s important to follow the process workflow to be successful in your Datacenter transition to the Microsoft Azure Cloud.


Here you find all the Microsoft Azure Migration information


App Migration to Azure: Your options explained by Jeremy Winter

The Azure Migrate service assesses on-premises workloads for migration to Azure. The service assesses the migration suitability of on-premises machines, performs performance-based sizing, and provides cost estimations for running on-premises machines in Azure. If you’re contemplating lift-and-shift migrations, or are in the early assessment stages of migration, this service is for you. After the assessment, you can use services such as Azure Site Recovery and Azure Database Migration Service, to migrate the machines to Azure.

In your datacenter you got all kind of different workloads and solutions like :

  • Hyper-V Clusters
  • VMware Clusters
  • SQL Clusters
  • Print Clusters
  • File Clusters
  • Web Farm
  • Two or three tiers solutions
  • Physical Servers
  • Different Storage solutions

When you do your Datacenter Assessment it’s important to get your workloads visible, because “Lift and Shift” with Azure Site Recovery (ASR) of a Virtual Machine is an different scenario then SQL database migration to Azure. That’s why Microsoft has different tooling like :

To get your dependencies in your Datacenter on the map, Microsoft has Azure Service Maps.

Service Map automatically discovers application components on Windows and Linux systems and maps the communication between services. With Service Map, you can view your servers in the way that you think of them: as interconnected systems that deliver critical services. Service Map shows connections between servers, processes, inbound and outbound connection latency, and ports across any TCP-connected architecture, with no configuration required other than the installation of an agent.

This is very handy to get insides of your Datacenter communication workloads.

More information on using Azure Service Maps here

Installation example of Hyper-V Virtual Machines with ASR

In the following step-by-step guide we will install the Azure Site Recovery Agent on a Hyper-V host and migrate a virtual machine to Microsoft azure in a “Lift and Shift” way.

First create a Recovery Services Vault => Click Add.

Then you go to your new created Recovery Vault and click on Getting started for Site Recovery. => Prepare infrastructure and follow the steps.

When you have selected Hyper-V VM to Azure, the next step is the ASR Deployment Planner tool kit. Here you find more information on Azure Site Recovery Deployment Planner user guide for Hyper-V-to-Azure production deployments.

Then in step 3 you will make your Hyper-V Site in Microsoft azure with the Right Hyper-V Servers.

Give your Hyper-V Site the right name, especially when you have a lot of Hyper-V Clusters with Different workloads.

Here is where the registration begins with the Azure Site Recovery (ASR) Agent installation on your Hyper-V Host.
Follow the five steps and make sure your Hyper-V Node can access Azure via secure port 443(https) via Proxy or firewall rules.

Install as Administrator the AzureSiteRecoveryProvider.exe file on the Hyper-V host.

Click on Next

Choose your Installation location and Click on Install.

The Azure Site Recovery agent is installed and need to be registered with your Azure Recovery Vault.
For this you need the key file from the Azure portal to download at step 4. Click on Register.

Browse to your downloaded key file from the Azure Portal Recovery Vault and click on Next.

When you have a proxy you can select that, otherwise select Next.

Now your Azure ASR Agent on Hyper-V is registered with your Azure Site Recovery Vault.

In the Azure Portal you will see your Hyper-V Node, in my Demo LAB it’s WAC01.MVPLAB.LOCAL.

In the next step you can choose an existing Storage account, or a new one with different specifications.

Check also after storage your network in azure.

In this step we create the replication policy.

Set your own settings.

The Replication policy is added to the configuration.

When you click on OK the Infrastructure is done.

We are now going to enable the replication :

Select your Source and location.

here you select your target Storage account, Resource Group and Network.

The connections are made between Hyper-V, ASR Vault and Storage.

Select the Virtual Machine(s) from the Hyper-V host to replicate for migration with ASR

Configure the properties.

Click on OK

From here the Replication will begin from Hyper-V Host to Azure  🙂

Azure Sire Recovery Replication Job status.

Replicated item(s)

To make your recovery plan and do the failover for migration to azure, you have to wait until the first replication is done for 100%.

Azure Site Recovery Plan for failover (Migration)

Make recovery Plan.

Click OK

The Target in the recovery plan can only be selected when the first replication is done.

Overview of the Azure Site Recovery Migration failover.

From the Hyper-V Host you can pause or see the replication health status.

Hyper-V Health Status

Azure Migrate Virtual Machines using Azure Site Recovery video with Microsoft Jeff Woolsey

Microsoft Azure Data Migration Assistant

To migrate your SQL Backend to Microsoft Azure, use this step-by-step instructions help you perform your first assessment for migrating to on-premises SQL Server, SQL Server running on an Azure VM, or Azure SQL Database, by using Data Migration Assistant.

Conclusion :

“Lift and Shift” Migration of your complete datacenter exists of different scenarios for your workloads to Microsoft Azure. With that said, Microsoft has for each scenario tooling available to get the job done. It’s all about a good Architectural Design, Security in place, People and process to get your Intelligent Azure Cloud up and running for your Business.

Next Blogpost Microsoft Azure Hub-Spoke model by Enterprise Design 3 of 4 :
SQL assessment and Data Migration to Azure


Leave a comment

Protecting Enterprise workloads with #Cloud First #Azure Backup #Baas #RaaS

Azure Backup is the Azure-based service you can use to back up (or protect) and restore your data in the Microsoft cloud. Azure Backup replaces your existing on-premises or off-site backup solution with a cloud-based solution that is reliable, secure, and cost-competitive. Azure Backup offers multiple components that you download and deploy on the appropriate computer, server, or in the cloud. The component, or agent, that you deploy depends on what you want to protect. All Azure Backup components (no matter whether you’re protecting data on-premises or in the cloud) can be used to back up data to a Backup vault in Azure.
See the Azure Backup components table

Azure Backup’s cloud-first approach and why it matters by Principal Group Program Manager, Azure Backup Shreesh Dubey

Cloud-first value propositions

These are the benefits customers would likely expect in backup scenarios as they augment the public cloud to their IT infrastructure:

  1. Consistent management experience for Hybrid IT: Companies will be in a hybrid model where in addition to the on-premise IT, they will have a cloud foot print that has IaaS (“lift-and-shift applications”) that possibly extends to PaaS (“born-in-the-cloud applications”) and SaaS (O365). It is important to have a consistent experience to manage backups across the IT assets in this hybrid model.
  2. Agility: Business owners are seeking more agility offered by the public cloud where they can deploy solutions from the marketplace to meet their business needs. From a backup perspective, an application admin should be able to sign up for backup and do self-service restores without having to go through a central IT process to provision compute/storage in the cloud to enable backup.
  3. Reduce TCO (Total Cost of Ownership): A subscription based model (PAYG) is an obvious benefit of the public cloud, but it is also important to consider overall IT cost for backup. For example, if you need to deploy additional infrastructure in the cloud (compute and storage) for backups your overall costs would be higher.
  4. Freedom from infrastructure: This is one of the fundamental benefits companies seek when they move their IT to the cloud and since backup has a significant infrastructure footprint in on-premises IT (storage, compute, licenses, etc), an infrastructure-less backup solution would be a natural expectation for customers

Read and see more about Microsoft Azure Backup Cloud-First Approach

Here you can download the Microsoft Azure Backup Online documents converted into a PDF Format


Leave a comment

Get Started here with Microsoft log #Analytics for Hybrid Environment #MSOMS #Azure #HybridCloud #Sysctr

download-log-analytics

Learn how to use Log Analytics in the Operations Management Suite to collect and analyze data generated by resources in your cloud and on-premises environments. Tutorials and other documentation show you how to get real-time insights across your workloads and servers regardless of physical location

Generate a PDF document about Log Analytics from Online documentation here

Proactive insights on workloads

  • Assess the risk and health of major workloads such as Active Directory and SQL.
  • View status of antimalware across your entire environment
  • Identify missing system updates across Windows and Linux servers
  • Detect potential configuration issues or deviations from identified best practices
  • Create alerts, alert rules, and notification timeframes

Rich data visualization

  • Analyze petabytes of data from the cloud with unlimited data retention
  • Chart and compare complex statistical functions
  • Use View Designer to create your own visualization of data queries
  • Send datasets to Power BI for enhanced visualization capabilities

Visibility across clouds and platforms

  • Connect to Linux and Windows virtual machines with one click
  • Ingest data from System Center, Zabbix, and Nagios
  • Collect any type of data through custom log collection
  • Securely send log data through proxy server and OMS Gateway


msoms-dashboard

Get started here with a Free OMS account


Leave a comment

Hybrid IT Connect computers and devices to #MSOMS using the OMS Gateway #Winserv #Linux

oms-agents

Instead of each individual agent sending data directly to OMS and requiring a direct Internet connection, all agent data is instead sent through a single computer that has an Internet connection. That computer is where you install and use the gateway. In this scenario, you can install agents on any computers where you want to collect data. The gateway then transfers data from the agents to OMS directly.

Here you can start with downloading the software for Microsoft OMS Gateway

oms-gateway-installer

oms-gateway-install-1

oms-gateway-install-2

oms-gateway-install-3

I used the default port 8080 for the Gateway.

oms-gateway-install-4

oms-gateway-install-5

oms-gateway-install-6

Now the Microsoft OMS Gateway Services is installedoms-gateway-running

Now Microsoft Operations Management Suite Gateway is installed, you can use some Microsoft Powershell Commands :

oms-gateway-powershell-1

oms-gateway-powershell-3

After the installation of the OMS Gateway, I installed the OMS Agent :

oms-connection

Download your OMS Agent here

oms-agent-1

oms-agent-2

oms-agent-3

oms-agent-4

oms-agent-5

Copy => Paste your OMS Workspace ID and Key.

oms-agent-6a

oms-agent-7

oms-agent-8

oms-agent-control

Here you can see the OMS Agent Connection settings.

oms-agent-9

When you wait for a few minutes you will see the connection in the Portal of OMS.

oms-connection

After this I installed the OMS Agent on One of my Domain Controllers with OMS Gateway settings //HyperV2016.hybridcloud4you.nl:8080.

This is what you will see in the Event Viewer of the OMS Gateway Server :

oms-gateway-events-next

Domain Controller 192.168.2.100 is going via the OMS Gateway

oms-agents-in-the-portal

OMS Agent via the Microsoft OMS Gateway

oms-portal

From here you can start with your OMS Solutions 😉

It is also possible to connect your System Center Operations Manager (SCOM) on-premises to the OMS Gateway.
Then you don’t have to connect your SCOM Management Server directly to the internet to OMS.

scom-oms-gateway

SCUG Banner


Leave a comment

Free #Microsoft Architecting #HybridCloud Environments whitepaper #Azure #Sysctr #Hyperv

HybridCloud

Hybrid cloud environments combine traditional on-premises IT with the consumption of cloud-based capacity (IaaS) and other cloud-based services. When carefully planned and executed, hybrid cloud models can deliver much of the best of both on-premises and cloud services. This paper focuses on understanding the different design approaches for architecting hybrid cloud environments, using technologies available from Microsoft, Microsoft Partner Solutions, and the Open Source community. Its objective is to enable IT architects to develop the right infrastructure strategies to deliver more of the potential promised by hybrid cloud-enabled scenarios.

Here you can download the Microsoft Architecting Hybrid cloud environments Whitepaper

On-Premises to Azure

On-premises to Microsoft Azure.


Leave a comment

#Microsoft Azure Backup D2D and for Longtime Protection D2D2C #HybridCloud #Backup #Azure #Sysctr

Backup2Disk2Cloud

Microsoft Azure Backup Vault Services

With Microsoft Azure Backup, you can protect application workloads such as Hyper-V VMs, Microsoft SQL Server, SharePoint Server, Microsoft Exchange and Windows clients to:
– Disk (D2D), giving high RTOs for tier 1 workloads
– Azure (D2D2C) for long term retention.
And, you can manage the protection of various protected entities (servers and clients) from a single on-premises user interface.

You can deploy Microsoft Azure Backup server as:
– A physical standalone server.
– A Hyper-V virtual machine – You can run DPM as a virtual machine hosted on an on-premises Hyper-V host server, to back up on-premises data.
– A Windows virtual machine in VMWare – You can deploy DPM to provide protection for Microsoft workloads running on Windows virtual machines in VMWare. In this scenario DPM can be deployed as a physical standalone server, as a Hyper-V virtual machine, or as a Windows virtual machine in VMWare.
– An Azure virtual machine – You can run DPM as a virtual machine in Azure to back up cloud workloads running as Azure virtual machines.

Here you can download Microsoft Azure Backup

HybridCloud DPM

Microsoft Azure Backup Documentation


Leave a comment

Set up protection between on-premises #VMware virtual machines or physical servers and #Azure #HybridCloud

asrvmware_arch

Azure Site Recovery contributes to your business continuity and disaster recovery (BCDR) strategy by orchestrating replication, failover and recovery of virtual machines and physical servers. Read about possible deployment scenarios in the Azure Site Recovery overview.

This walkthrough describes how to deploy Site Recovery to:

  • Protect on-premises VMware virtual machines to Azure
  • Protect on-premises physical Windows and Linux servers to Azure

Business advantages include:

  • Protection of physical Windows or Linux servers.
  • Simple replication, failover, and recovery using the Azure Site Recovery portal.
  • Data replication over the Internet, a site-to-site VPN connection, or over Azure ExpressRoute.
  • Failback (restore) from Azure to an on-premises VMware infrastructure.
  • Simplified discovery of VMware virtual machines.
  • Multi VM consistency so that virtual machines and physical servers running specific workloads can be recovered together to a consistent data point.
  • Recovery plans for simplified failover and recovery of workloads tiered over multiple machines.

Deployment components

  • On-premises machines—Your on-premises site has machines that you want to protect. These are either virtual machines running on a VMware hypervisor, or physical servers running Windows or Linux.
  • On-premises process server—Protected machines send replication data to the on-premises process server. The process server performs a number of actions on that data. It optimizes it before sending it on to the master target server in Azure. It has a disk-based cache to cache replication data that it receives. It also handles push installation of the Mobility Service which must be installed on each virtual machine or physical server you want to protect, and performs automatic discovery of VMware vCenter servers. The process server is a virtual or physical server running Windows Server 2012 R2. We recommend it’s placed on the same network and LAN segment as the machines that you want to protect, but it can run on a different network as long as protected machines have L3 network visibility to it. During deploy you’ll set up the process server and register it to the configuration server.
  • Azure Site Recovery vault—The vault coordinates and orchestrates data replica, failover, and recovery between your on-premises site and Azure.
  • Azure configuration server—The configuration server coordinates communication between protected machines, the process server, and master target servers in Azure. It sets up replication and coordinates recovery in Azure when failover occurs. The configuration server runs on an Azure Standard A3 virtual machine in your Azure subscription. During deployment you’ll set up the server and register it to the Azure Site Recovery vault.
  • Master target server—The master target server in Azure holds replicated data from your protected machines using attached VHDs created on blob storage in your Azure storage account. You deploy it as an Azure virtual machine as a Windows server based on a Windows Server 2012 R2 gallery image (to protect Windows machines) or as a Linux server based on a OpenLogic CentOS 6.6 gallery image (to protect Linux machines). Two sizing options are available – standard A3 and standard D14. The server is connected to the same Azure network as the configuration server. During deployment you’ll create the server and register it to the configuration server.
  • Mobility service—You install the Mobility service on each VMware virtual machine or Windows/Linux physical server that you want to protect. The service sends replication data to the process server, which in turn sends it to the master target server in Azure. The process server can automatically install the Mobility service on protected machines, or you can deploy the service manually using your internal software deployment process.
  • Data communication and replication channel—There are a couple of options. Note that neither option requires you to open any inbound network ports on protected machines. All network communication is initiated from the on-premises site.
    • Over the Internet—Communicates and replicates data from protected on-premises servers and Azure over a secure public internet connection. This is the default option.
    • VPN/ExpressRoute—Communicates and replicates data between on-premises servers and Azure over a VPN connection. You’ll need to set up a site-to-site VPN or an ExpressRoute connection between the on-premises site and your Azure network.

Here you find the Microsoft Step-by-Step blogpost to Set up protection between on-premises VMware virtual machines or physical servers and Azure


Leave a comment

UPDATE Microsoft Virtual Machine Converter 3.0 #SCVMM #Azure #Hyperv #VMware

MVMC3

Microsoft Virtual Machine Converter (MVMC) is a Microsoft-supported, stand-alone solution for the information technology (IT) pro or solution provider who wants to convert virtual machines and disks from VMware hosts to Hyper-V hosts and Microsoft Azure or alternatively convert a physical computer running Windows Server 2008 or above server operating systems or Windows Vista or above client operating systems to a virtual machine running on Hyper-V host

MVMC can be deployed with minimal dependencies. Because MVMC provides native support for Windows PowerShell, it enables scripting and integration with data center automation workflows such as those authored and run within Microsoft System Center Orchestrator 2012 R2. It can also be invoked through the Windows PowerShell command-line interface. The solution is simple to download, install, and use. In addition to the Windows PowerShell capability, MVMC provides a wizard-driven GUI to facilitate virtual machine conversion.

New Features in MVMC 3.0
The 3.0 release of MVMC adds the ability to convert a physical computer running Windows Server 2008 or above server operating systems or Windows Vista or above client operating systems to a virtual machine running on Hyper-V host.

Standard Features
•Converts virtual disks that are attached to a VMware virtual machine to virtual hard disks (VHDs) that can be uploaded to Microsoft Azure.
•Provides native Windows PowerShell capability that enables scripting and integration into IT automation workflows.
Note The command-line interface (CLI) in MVMC 1.0 has been replaced by Windows PowerShell in MVMC 2.0.
•Supports conversion and provisioning of Linux-based guest operating systems from VMware hosts to Hyper-V hosts.
•Supports conversion of offline virtual machines.
•Supports the new virtual hard disk format (VHDX) when converting and provisioning in Hyper-V in Windows Server 2012 R2 and Windows Server 2012.
•Supports conversion of virtual machines from VMware vSphere 5.5, VMware vSphere 5.1, and VMware vSphere 4.1 hosts Hyper-V virtual machines.
•Supports Windows Server 2012 R2, Windows Server 2012, and Windows 8 as guest operating systems that you can select for conversion.
•Converts and deploys virtual machines from VMware hosts to Hyper-V hosts on any of the following operating systems:
•Windows Server 2012 R2
•Windows Server 2012
•Windows Server 2008 R2 SP1
•Converts VMware virtual machines, virtual disks, and configurations for memory, virtual processor, and other virtual computing resources from the source to Hyper-V.
•Adds virtual network interface cards (NICs) to the converted virtual machine on Hyper-V.
•Supports conversion of virtual machines from VMware vSphere 5.5, VMware vSphere 5.0, and VMware vSphere 4.1 hosts to Hyper-V.
•Has a wizard-driven GUI, which simplifies performing virtual machine conversions.
•Uninstalls VMware Tools before online conversion (online only) to provide a clean way to migrate VMware-based virtual machines to Hyper-V.
Important MVMC takes a snapshot of the virtual machine that you are converting before you uninstall VMware Tools, and then shuts down the source machine to preserve state during conversion. The virtual machine is restored to its previous state after the source disks that are attached to the virtual machine are successfully copied to the machine where the conversion process is run. At that point, the source machine in VMware can be turned on, if required.
Important MVMC does not uninstall VMware Tools in an offline conversion. Instead, it disables VMware services, drivers, and programs only for Windows Server guest operating systems. For file conversions with Linux guest operating systems, VMware Tools are not disabled or uninstalled. We highly recommend that you manually uninstall VMware Tools when you convert an offline virtual machine.
•Supports Windows Server and Linux guest operating system conversion. For more details, see the section “Supported Configurations for Virtual Machine Conversion” in this guide.
•Includes Windows PowerShell capability for offline conversions of VMware-based virtual hard disks (VMDK) to a Hyper-V–based virtual hard disk file format (.vhd file).
Note The offline disk conversion does not include driver fixes.

You can download the Microsoft Virtual Machine Converter 3.0 and documentation here