Join Microsoft and the Community November 2–4, 2021 to explore the latest tools, training sessions, technical expertise, networking opportunities, and more. You can register here
Here you find some great MSIgnite guidance on Microsoft Tech Community :
Installing Windows Server Insider Datacenter Azure Edition
In my last blogpost we installed Windows 11 Insider Preview Enterprise Build on a Microsoft Azure Virtual Machine. Now we do the same with Windows Server 2022 Insider build version on Microsoft Azure Cloud.
IMPORTANT
This blogpost is for testing only and not ready for production environments yet!
Before you Search for the Windows Server Insider Preview image, you need some preview features added to your azure subscription first. Here you find more information
One of the features is Inquest Hot patching, which we activate via Azure Cloud Shell with Bash Azure CLI :
az feature register –namespace Microsoft.Compute –name InGuestHotPatchVMPreview az feature register –namespace Microsoft.Compute –name InGuestAutoPatchVMPreview az feature register –namespace Microsoft.Compute –name InGuestPatchVMPreview
Register via Azure CLI with these commands.
Feature registration can take up to 15 minutes. To check the registration status:
az feature show –namespace Microsoft.Compute –name InGuestHotPatchVMPreview
az feature show –namespace Microsoft.Compute –name InGuestAutoPatchVMPreview
az feature show –namespace Microsoft.Compute –name InGuestPatchVMPreview
When registration is done, you will see this message.
Once the feature has been registered for your subscription, complete the opt-in process by propagating the change into the Compute resource provider.
Type the following Azure CLI commandline :
az provider register –namespace Microsoft.Compute
Now your Microsoft Azure Subscription is ready for the new Features with the Windows Server 2022 Insider Preview Datacenter Azure Edition Build.
You need the Core edition when you want to try hotpatching.
and you need to be a Windows Server Insider.
Add Storage to your Virtual Machine.
Because it’s for testing only I selected SSD.
Set your network settings.
Set Management settings like Hotpatch Preview.
At Advanced tab you can add Extensions and Custom scripts.
Click on Review + Create
Validation is passed, Click on Create and the
Windows Server Insider 2022 Datacenter Azure Edition will deploy.
IMPORTANT
Check the Network Security Group (NSG) of the Virtual Machine in Azure and set the security settings!
Set the Security Settings in the NSG.
Because we Installed the Windows Server Insider Core version,
Windows Admin Center (Preview) is very handy for Management.
Running Windows Server 2022 Insider Build 10.0.20348.166 in Azure
with Windows Admin Center (Preview) for Testing.
Now we wait for the Hotpatch 😉
Conclusion
Microsoft Azure Cloud platform is great for testing new products like Windows Server Insider Build versions, Windows 11 Insider Preview and the new Azure features. So when this becomes GA in the future you have already the experience and did some feedback to the Microsoft Product Team 😉
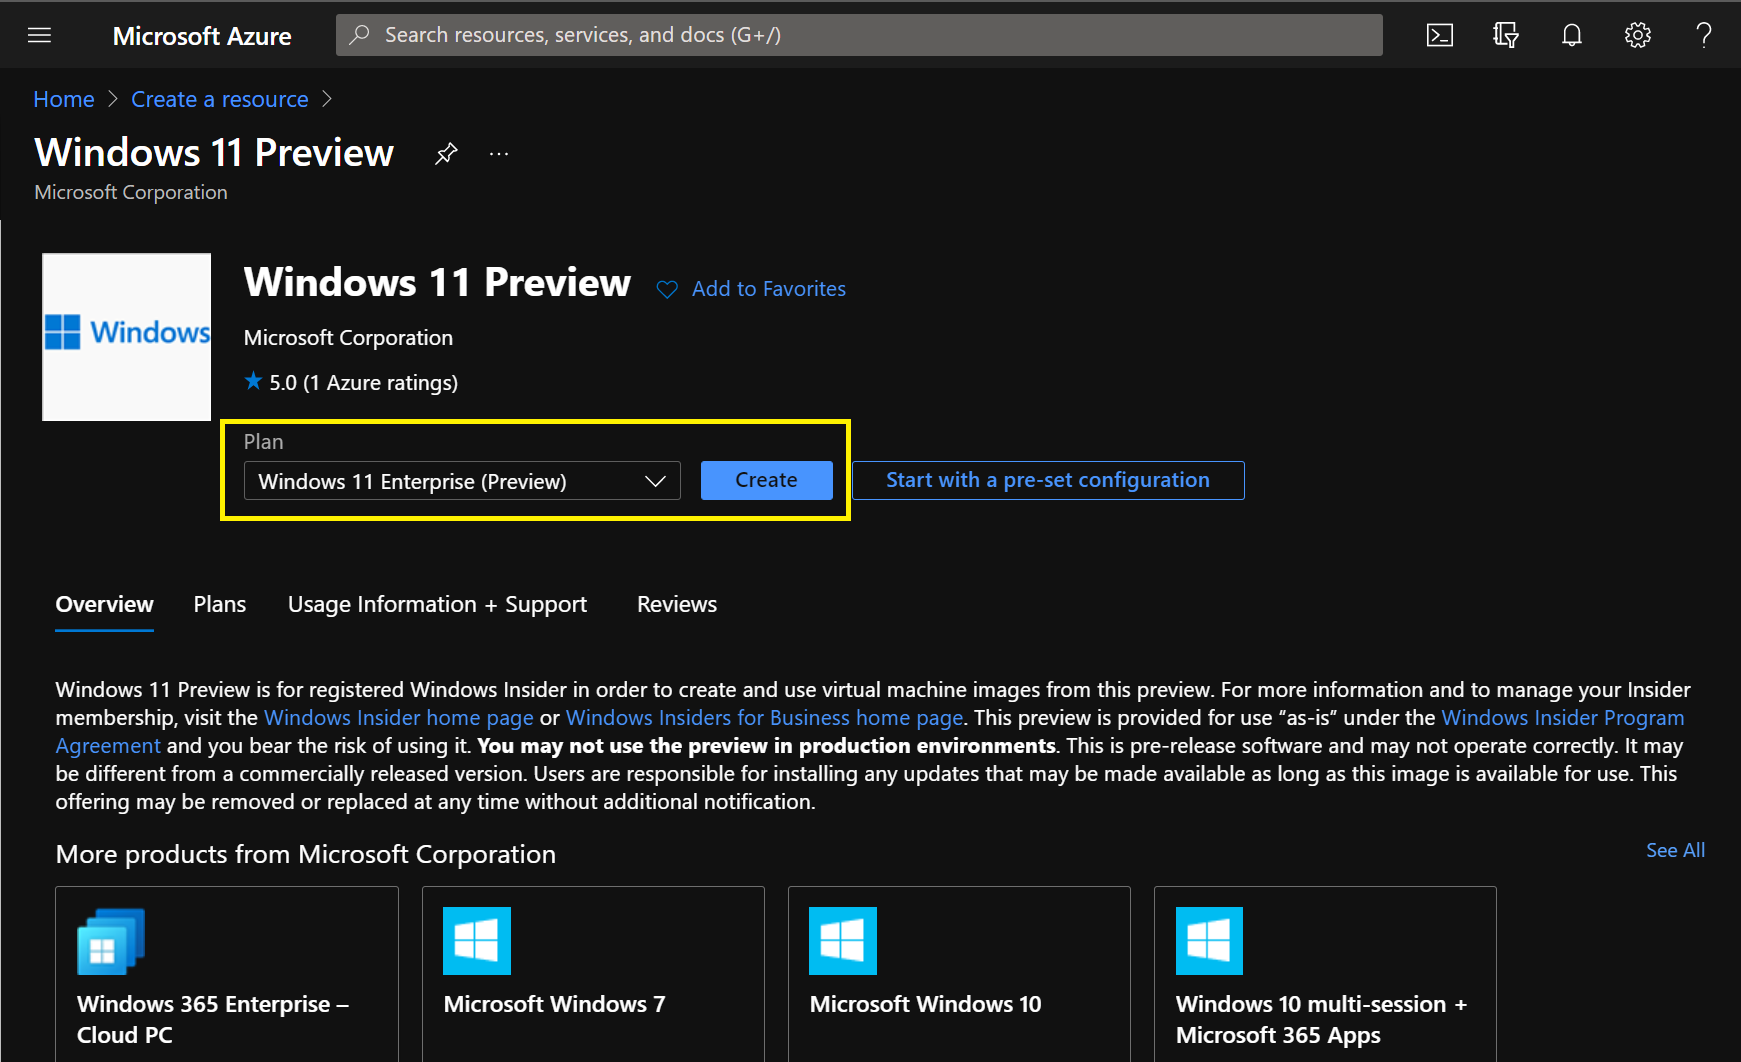
As a Windows Insider it’s great to have your machine in the Microsoft Azure Cloud to test new features of Windows 11 Preview. You don’t have to buy compatible hardware for Windows 11 Preview, and you only pay for the machine when you use it in the Cloud. Here you find the Windows 11 Preview minimal requirements.
In the following steps I deploy Windows 11 Preview Enterprise in Azure Cloud.
Create your Windows 11 Preview Machine in Azure Cloud.
For this you need a Microsoft Azure Subscription to create a Windows 11 Preview Virtual Machine in the Cloud. In the Azure template for deployment you can select the right size Virtual Machine, Storage, networks, and Management extensions like security and Azure Monitor.
Before you Connect your Windows 11 Preview VM, make sure the security for RDP is set in the Network Security Group (NSG)
Set security for your RDP session in the NSG.
Go to Settings => Windows Update => Windows Insider Program.
Click on Get Started.
First step link an account to join the program.
(This must be your Windows Insiders account)
Sign in selection and continue.
IMPORTANT
Here you select your Windows Insider Channel, read the information and choose your
Windows Insider Build Channel. As a Windows Insider MVP I choose for the Dev Channel to give feedback to the product Team and get the first new features of Windows 11 Preview.
Read the recommendations and click on Continue.
Review the Agreements for your Device.
Click on Continue if you agree.
Restart the Virtual Machine into the Dev Channel for
the latest updates.
Set your Windows Update Advanced options.
Here we have Windows 11 Preview Insider Build 22000.160 on Azure Cloud 😉
After this I went to the Windows Insider Feedback Hub to do my settings :
At Settings of the Feedback Hub you can update the software.
and of course your personal settings.
I Like the Windows Insider Feedback Hub in Dark mode.
IMPORTANT
When you are ready with testing and sending feedback to Microsoft don’t forget to Stop the Virtual Machine! This save you money.
Conclusion
Microsoft Azure Cloud Services and Windows 11 Preview Insider Builds working together gives you flexibility and as a Windows Insider you can test every Windows 11 Preview Build from any place with a Internet connection. I like to give Microsoft feedback to make Windows Awesome for everyone on the planet 🙂
Azure Monitor Insights for Monitoring your Containers.
In the last blogpost I wrote about Microsoft Azure Arc Services and how to connect a Docker for Desktop Kubernetes Cluster for testing your DevOps solution like Container Apps, Functions, App Services in a test environment. Here you find the Link to the Installation.
One of the Microsoft Azure Arc features is Azure Monitor Insights for monitoring your Kubernetes Cluster and the Containers.
Azure Arc Insights for Kubernetes Cluster anywhere
In the following step-by-step guide we will configure Azure Monitor Insights for your Kubernetes Cluster.
I Connected my Analytics Workspace CloudMVPLab.
Click on Configure.
Onboarding your Kubernetes Cluster will take some minutes.
After a while your Kubernetes Cluster Analytics data will show in Insights.
Here you see a navigation bar with the following topics
What’s New
Cluster
Reports
Nodes
Controllers
Containers.
Insights reports of the Kubernetes Cluster
Here you can Click on default reports of your Kubernetes Cluster.
Storage Capacity and Health Status report of your Kubernetes Cluster.
Storage Capacity more in Details.
Deployments Report of your Kubernetes Cluster.
Workload details Report of your Kubernetes Cluster.
Kubelet report of your Kubernetes Cluster
Data Usage of your Kubernetes Cluster
Data Usage
Insights the Nodes of the Kubernetes Cluster
Insights of the Nodes and on the right you can view Analytics.
Here you can work with Log Analytics on your Cluster.
Insights in Controllers of your Kubernetes Cluster
Insights of your Controllers
Insights Containers of your Kubernetes Cluster
Container Insights of your Kubernetes Cluster
Container Insights with Azure Log Analytics.
So with Azure Arc Enabled Kubernetes Clusters you can monitoring your Cluster and running Containers to keep you in Control on what is happening on the Cluster but also with your Container Apps and microservices. After this you can set Alerts and notifications when something is going wrong or offline. With this running you can start running your own App services, Containers or Azure functions on your Kubernetes Cluster.
This configuration with Docker for Desktop Kubernetes Cluster is for testing purpose only and can be used for your own DevOps solutions before you deploy on Production Ready Clusters. With Azure Arc Enabled Kubernetes Clusters you get the powerful Microsoft Azure Features and solutions in a secure way on your Kubernetes Cluster. I wish you lot of success with Azure Arc Enabled Kubernetes Clusters to make Awesome Apps and IT solutions for the Business 😉
I Hope everyone had a Great Microsoft Build 2021 Online Conference this week. Microsoft announced a lot of new features and Hybrid Cloud Solutions at Build 2021 🙂 If you missed this Awesome Build 2021 event, you can watch the highlights on demand here.
DevOps and developers are increasingly using microservices-based architectures with containerized applications for agility and flexibility. Azure Arc extends the single control plane from Azure to enable you to build apps consistently across hybrid and multi-cloud environments. With this information I was thinking, can I connect Microsoft Azure Arc Services to my Surface Book 3 with Windows 10 Preview Insiders Build 21390 and Docker for Windows with Kubernetes Cluster 1.19.7 active?
IMPORTANT: The following step-by-step guide is for testing purpose only.
Installing Docker for Windows with Kubernetes Cluster on Windows 10
First you need to have Docker for Windows 10.
System requirements
Your Windows machine must meet the following requirements to successfully install Docker Desktop.
WSL 2 backend
Hyper-V backend and Windows containers
WSL 2 backend
Windows 10 64-bit: Home, Pro, Enterprise, or Education, version 1903 (Build 18362 or higher).
Enable the WSL 2 feature on Windows. For detailed instructions, refer to the Microsoft documentation.
The following hardware prerequisites are required to successfully run WSL 2 on Windows 10:
With docker desktop for Windows you can switch between Windows Containers and Linux Containers. When you want to have a Kubernetes Cluster on your Windows 10 device active you have to switch to Linux Containers in the taskbar like this :
It’s now active for Linux Containers. (Default)
Right Click on the Docker tray icon and go to Settings.
Then go to Kubernetes to enable your Cluster locally on your Windows 10 Device.
When you apply it take some minutes for the installation.
When you see the Kubernetes icon on green, then your Cluster is running.
When you do a lot of DevOps work you use Microsoft Visual Studio Code for Free, because here you can see your Kubernetes Cluster and try your own code or Apps.
Kubernetes Cluster is running locally on your Windows 10 device.
Installing Microsoft Azure Arc Agent
The next step is to install the Microsoft Azure Arc agent on your Windows 10 device.
Login in your Azure Subscription, if you don’t have one you can start here
Search for Azure Arc in your subscription.
Click on Servers and Click on Add.
Click on add a Single Server.
Click on Generate Script.
Prerequisites for the Azure Arc Agent.
Select your Azure Subscription and Resource Group
Choose your Region.
Operating System is Windows. ( your Windows10 device)
Click on Next.
More Features like Security, Monitoring, Automation :
Features for Kubernetes in Azure Arc Services.
Here you see in Visual Studio Code your Azure-Arc Helm Release.
Conclusion
“Learn how to write once and run anywhere using your preferred cloud-native application services. Ensure governance, compliance and security for your deployments, all through a single pane of glass management experience in Azure.”
With Microsoft Azure Arc Services you bring Azure Cloud Technology anywhere for your Apps, Containers, microservices.
I Hope this is a first start for exploring and testing your Hybrid Cloud solution. Wish you a lot of fun and happy coding 😉
Security by Design is increasingly becoming the mainstream development approach to ensure security of software systems. Security architectural design decisions are based on well-known security tactics, and patterns defined as reusable techniques for achieving specific quality concerns. In the following steps we will make a security baseline for Windows Servers with different tools.
1.Microsoft Security Compliance Toolkit
The Microsoft Security Configuration Toolkit enables enterprise security administrators to effectively manage their enterprise’s Group Policy Objects (GPOs). Using the toolkit, administrators can compare their current GPOs with Microsoft-recommended GPO baselines or other baselines, edit them, store them in GPO backup file format, and apply them via a domain controller or inject them directly into testbed hosts to test their effects. A security baseline is a group of Microsoft-recommended configuration settings that explains their security impact. These settings are based on feedback from Microsoft security engineering teams, product groups, partners, and customers. A lot of hacks are based on registry settings, so that’s why Windows Server Security Baseline is important.
You can download the Microsoft Security Compliance Toolkit here
2. Windows Defender Firewall with Advanced Security
Windows Defender Firewall with Advanced Security is an important part of a layered security model. By providing host-based, two-way network traffic filtering for a device, Windows Defender Firewall blocks unauthorized network traffic flowing into or out of the local device. Windows Defender Firewall also works with Network Awareness so that it can apply security settings appropriate to the types of networks to which the device is connected. Windows Defender Firewall and Internet Protocol Security (IPsec) configuration settings are integrated into a single Microsoft Management Console (MMC) named Windows Defender Firewall, so Windows Defender Firewall is also an important part of your network’s isolation strategy. So set only the firewall ports you need end to end.
Windows Security Setting Firewall & Network Protection
Select Advanced settings
Windows Defender Firewall Advanced settings Set only active what you need!
3. Windows Defender Security Virus & Threat Protection
Schedule a Full Scan in the Night for Threats
and Set the Windows Security options.
Keep your Defender and Virus definition files up-to-date.
4. Windows Updates
When your Windows Server is ready for production, you have to keep it Up-to-Date with Windows Updates. It’s not only the Windows Security patches, but all the software that’s running on your Server. One software leak is enough for a hacker to compromise your Server.
Lot of Companies are using Microsoft WSUS Services or Microsoft Endpoint Configuration Manager to deploy the software Life cycle Management Security updates to Servers to keep them secure as possible. These are not only Microsoft Security Updates but also from third party Software vendors, like adobe, Google, etc.
5. Security Monitoring and Remediation
This Cycle is important for Security!
IT departments have multiple teams with different disciplines, so when the Windows Server is ready
for the Administrator it goes to the Application Admin in a different IT Team. They will install the Application software and maybe
some software connections with other Servers by a third IT Team. To get in control of those security steps is important, because when a IT Consultant of a third party vendor is installing old legacy software you will have hacker leaks again and that’s making your Server vulnerable. Here is where Azure Security Center and Azure Defender will support you in monitoring and remediation of security issues.
It doesn’t matter where your Windows Server is installed, in Azure Cloud or On-premises in your datacenter, it can connect securely via internet for monitoring the Server. When it’s on-premises you can install the Microsoft Arc agent
Microsoft Azure Arc Connected Machine Agent.
Azure Arc enabled Server from On-premises
When the Microsoft Azure Arc Agent is installed on the Server, you can use these Azure Services for example :
Azure Update Management
Azure Monitoring
Azure Security Center with Azure Defender
Azure Policies for Compliance
Change Tracking and Inventory
Insights
Automation of Tasks
These Microsoft Azure features are supporting you to keep your Server as safe as possible and your security Up-to-Date.
From here you can add the Windows Server to Microsoft Azure Security Center with the right log analytics workspace.
Microsoft Azure Security Center Recommendations
Remediate Security Configurations on the Arc enabled Server
Remediation of Vulnerabilities on your Windows Server (Arc Enabled)
Azure Defender is a built-in tool that provides threat protection for workloads running in Azure, on premises, and in other clouds. Integrated with Azure Security Center, Azure Defender protects your hybrid data, cloud-native services, and servers and integrates with your existing security workflows, such as SIEM solutions and vast Microsoft threat intelligence, to streamline threat mitigation.
Workflow of Azure Defender for Vulnerability Scanning.
When Azure Security Center and Azure Defender are installed, you can do a Vulnerability Assessment on your Azure Arc enabled Server which is on-premises datacenter before your Windows Server is going in Production.
Vulnerabilities after Assessment on Windows Server with Arc enabled with remediation
This happens a lot when there is third party software installed on the Server.
To get a list of your high security vulnerabilities, you can use the Azure Resource Graph explorer.
Azure Resource Graph Explorer
Here you can download your high risks into a CSV or Pin to a Dashboard.
6. Compliance and Security Policies
Learn how Microsoft products and services help your organization meet regulatory compliance standards.
When you have to manage a lot of Windows Servers or Linux Servers, you want them compliant with the right security policies.
With Azure Security Policy you can configure your Compliance.
in the following steps you will see an Sample alert :
Sample Alerts with Mitre ATT&CK Tactics
Take Action on the Security Alert.
Related entities
Mitigate the Threat
Prevent future attacks
Trigger automated response
or
Suppress similar Alerts.
Security by Design Conclusion
Before you begin with deploying Windows Servers in your datacenter or in the Azure Cloud, it’s good to make a High Level design with your security set for the right compliance of your new Windows Server. You can use all the security On-Premises for Windows Server but with Azure Security Center, Azure Monitor, Azure Arc Services, Azure Defender you get all the security Insights and remediation options when a vulnerability is discovered. Windows Server and Azure Security Center is better together for Security Management.
Microsoft Security
If you want to keep your Windows Servers secure as possible, you need to keep doing these steps above. Continuous Monitoring and remediate vulnerabilities is a on-going process for SecOps and Administrators. Make it hackers difficult to add ransomware on your Servers. One more important IT Service, is your Backup / Disaster Recovery solution. This should be secure from hackers and from ransomware encryption. I always say think of this rule :
With Windows Admin Center you can remotely manage Windows Server running anywhere—physical, virtual, on-premises, in Azure, or in a hosted environment.
The tool, available with your Windows Server license at no additional charge, consolidates and reimagines Windows OS tools in a single, browser-based, graphical user interface.
At Microsoft Ignite 2021 Global Virtual Event they launched Windows Admin Center version 2103. Here you find the download.
Set Proxy Server in Windows Admin Center Settings.
Open in a Separate Window
This is a Separate Window on my Second Screen, this works Awesome!
Windows Admin Center Virtual Tool improvements 🙂
Conclusion
Microsoft is working hard to make Hybrid IT Management better for Administrators to manage Hybrid Cloud datacenters. Windows Admin Center is a must have for managing
Windows Server Core, AzureStack HCI, and Cluster Services. I can say: I love to work with Windows Admin Center 🙂
Dapris an open source, portable, event-driven runtime that makes it easy for developers to build resilient, microservice, stateless and stateful applications that run on the cloud and edge. Dapr enables developers to focus on writing business logic and not solving distributed system challenges, thereby significantly improving their productivity, and reducing development time. Dapr lowers the bar for entry to build modern cloud native applications based on a microservices architecture and with this v1.0 release, Dapr applications can be deployed to self-hosted infrastructure or Kubernetes clusters in production scenarios.
Foreword byMark RussinovichAzure CTO and Technical FellowMicrosoft
With the wave of cloud adoption well underway, there is a major shift happening towards “cloud native” development, often built with microservice-architectures. These microservices are both stateless and stateful, and run on the cloud and edge, embracing the diversity of languages and frameworks available today. This enterprise shift is driven by both the market forces of faster time to market, as well as the scale and efficiencies of building services for the cloud. Even before COVID-19, cloud adoption was accelerating for enterprises and developers were being asked to do even more to deliver on building these distributed system applications, and that has only accelerated since. Developers in enterprises seek to focus on business logic, while leaning on platforms to imbue their applications with scale, resiliency, maintainability, elasticity, and the other attributes of cloud-native architectures, which is why there is also shift towards serverless platforms that hide the underlying infrastructure. Developers should not be expected to become distributed systems experts. This is where Dapr steps in to help you, whether you are building on infrastructure such as Kubernetes, or on a serverless platform.
Dapr is designed as an enterprise, developer-focused, microservices programming model platform with the mantra “any language, any framework, run anywhere”. It makes building distributed applications easy and portable across any infrastructure, from public-cloud, through hierarchical edge, and even down to single node IoT devices. It emerged from both our experiences building services in Azure as well as time spent working with customers building applications on Azure Kubernetes Service and Azure Service Fabric. Over and over, we saw common problems that they had to address. It became clear that there was a need to provide a “library” of common microservice best practices that developers could use, not only in new greenfield applications, but also to aid in the modernization of existing applications. In the containerized, distributed, and networked cloud native world, the sidecar model has emerged as the preferred approach, in the same way DLLs are preferred in the client/server generation. Using Dapr’s sidecar and APIs give you, as a developer, all the power of distributed systems functionality, with the ease of a single HTTP or gRPC local call.
To address the wide range of scenarios that developers face, Dapr provides features such as state management, service to service invocation, pub/sub and integration to external systems with I/O bindings, which are based on the triggers and bindings of Azure Functions. These in turn take advantage of Dapr’s component model which allows you to “swap out”, say different underlying state stores, without having to change any code, making code more portable, more flexible and allowing for experimentation of what best suits your needs. Developers don’t need to learn and incorporate service SDKs into their code, worry about authentication, secret management, retries or conditional code that targets specific deployment environments.
This book shows how Dapr reduces your development time and overall code maintenance by incrementally “Daperizing” the canonical .NET reference application, eShop. For example, in the original eShop implementation, significant amounts of code were written to abstract between Azure Service Bus and RabbitMQ for publishing events between services. All this code can be discarded and simply replaced with Dapr’s pub/sub API and component model which had an even wider range of pub/sub brokers, rather than just two. Dapr’s actor model, when used in the reworked eShop application, shows the ease of building long running, stateful, event driven, workflow applications with all the difficulties of concurrency and multi-threading removed. By the end of this book, you will see the drastic simplification that Dapr brings to your application development, and I firmly believe all developers embarking on a cloud native app building journey should leverage Dapr.
We publicly announced Dapr with the v0.1 release in Oct 2019 and now, a year and half later, I am thrilled to say that Dapr is ready for production usage with the v1.0 release. Getting Dapr to v1.0 has truly been a community effort. It has been amazing to see the open-source community coalesce around Dapr and grow since it was first announced – from 114 contributors in October 2019 to over 700 in early 2021 – a six-fold increase in 16 months! Contributions to the project have gone to every Dapr repo and have ranged from opening issues, commenting on feature proposals, providing samples, and of course contributing code. The parts of the project community members have contributed to the most include the Dapr runtime, docs, CLI, SDKs and the creation of a rich ecosystem of components. Maintaining this openness is critical to Dapr’s future.
Dapr is really just getting started, though, and you should expect to see more Dapr capabilities and more support for Dapr in Azure services. I hope that you will take advantage of Dapr to enable you to focus on your core business logic and accelerate your microservices development. I am are excited to have you join us in the Dapr community on this journey athttps://github.com/dapr/and on Discord https://aka.ms/dapr-discord.
Modern distributed systems are complex. You start with small, loosely coupled, independently deployable services. These services cross process and server boundaries. They then consume different kinds of infrastructure backing services (databases, message brokers, key vaults). Finally, these disparate pieces compose together to form an application.
Mark RussinovichAzure CTO and Technical FellowMicrosoft
Thank you Author; Rob Vettor, Sander Molenkamp and Edwin van Wijk for this Awesome E-book 😉
Azure Arc enabled servers allows you to manage your Windows and Linux machines hosted outside of Azure, on your On-premises network, or other cloud provider consistent with how you manage native Azure virtual machines. When a hybrid machine is connected to Azure, it becomes a connected machine and is treated as a resource in Azure. Each connected machine has a Resource ID, is included in a resource group, and benefits from standard Azure constructs such as Azure Policy and applying tags. Service providers who manage a customer’s on-premises infrastructure can manage their hybrid machines, just like they do today with native Azure resources, across multiple customer environments, using Azure Lighthouse with Azure Arc.
To deliver this experience with your hybrid machines hosted outside of Azure, the Azure Connected Machine agent needs to be installed on each machine that you plan on connecting to Azure. This agent does not deliver any other functionality, and it doesn’t replace the Azure Log Analytics agent. The Log Analytics agent for Windows and Linux is required when you want to proactively monitor the OS and workloads running on the machine, manage it using Automation runbooks or solutions like Update Management, or use other Azure services like Azure Security Center.
Now we have my Dark20H2.MVPLAB.LOCAL Windows Server Core managed by Windows Admin Center, I like to connect the Windows Server 20H2 Core to Azure Arc Services for Hybrid IT Management to get the benefits of the Cloud.
In the next step-by step guide we will enable Azure Arc Services by installing the agent on the Windows Server 20H2 Core.
Prerequisites
If you don’t have an Azure subscription, create a free account before you begin.
Deploying the Arc enabled servers Hybrid Connected Machine agent requires that you have administrator permissions on the machine to install and configure the agent. On Linux, by using the root account, and on Windows, with an account that is a member of the Local Administrators group.
Before you get started, be sure to review the agent prerequisites and verify the following:
If the machine connects through a firewall or proxy server to communicate over the Internet, make sure the URLs listed are not blocked.
Azure Arc enabled servers supports only the regions specified here.
Open Azure Arc in the Portal.
Because I have already Azure Arc Active for my Azure Stack HCI Cluster in my MVPLAB.LOCAL, I will click on Servers on the left.
Click on Add
We will Generate a Script for the Single Windows Server 20H2 Core.
You can Add also Servers at Scale.
HTTPS Access to Azure Services is Needed
and
Local Administrator permissions, Click Next
Select the right Azure Subscription and the Resource Group.
Select the Azure Region and Operating System.
and the URL when you are behind a Proxy Server.
Click Next.
You can add Tags for Administrative tasks like Costs.
Click Next.
Here you can Copy and Paste the Script or Download it.
I downloaded the PowerShell Script.
Click on Close.
Windows Admin Center in action on Windows Server 20H2 Core
The Windows Server Dark20H2.mvplab.local is a basic installation and managed by Windows Admin Center
Now we have to do the following steps :
Copy the Azure Arc PowerShell Script to the Server with WAC.
Install Azure PowerShell on the Server
Run the Azure Arc PowerShell Script.
1. Copy the Azure Arc PowerShell Script to the Server with WAC
First we use Windows Admin Center to make a directory on the Server for uploading the Azure Arc PowerShell Script.
I have made a Azure Arc directory with Windows Admin Center.
Click on Upload.
Browse to your Azure Arc PowerShell Script.
Click on Submit.
The Azure Arc PowerShell Script is now on the Server.
2. Install Azure PowerShell on the Server
In the following steps we will install Microsoft Azure PowerShell on the Server via Windows Admin Center.
Type: $PSVersionTable.PSVersion
You need at least PowerShell 5.1
Make sure you have the latest version of PowerShellGet. Run Install-Module -Name PowerShellGet -Force
Run the following script :
———————————————————————-
if ($PSVersionTable.PSEdition -eq ‘Desktop’ -and (Get-Module -Name AzureRM -ListAvailable)) { Write-Warning -Message (‘Az module not installed. Having both the AzureRM and ‘ + ‘Az modules installed at the same time is not supported.’) } else { Install-Module -Name Az -AllowClobber -Scope CurrentUser }
———————————————————————–
Type Y or A ( Yes or Yes to All)
Installing the Azure PowerShell Modules.
Now we are ready for the Azure Arc PowerShell Script.
3. Run Azure Arc PowerShell Script on the Server.
From here we are going to install the Microsoft Azure Arc PowerShell Script to join this server to Azure Arc Services with an Agent.
Run .\OnboardingScript (1).ps1
It will ask for a Device login to Azure with a Code.
I did that on the Windows Admin Center Server.
When you Login to Azure with your Account you will see this Screen.
The Next screen is the completion in Windows Admin Center PowerShell of the Windows Server 20H2 Core.
This Dark20H2.mvplab.local Server is now connected with Azure Arc Services.
Azure Arc Enabled Server.
Here we see the Windows Server 202H2 Core in Azure Arc.
Azure Arc Services
Installing Azure Arc Insights
Here we start with one of the Azure Arc Services on the On-Premises Windows Server 20H2 Core called Azure Arc Insights.
Click on Insights on the Left of the Azure Arc Server.
Click on Enable.
Select your Azure Subscription and Log Analytics Workspace.
Click on Enable.
Installation of Azure Arc Insights in progress……
It’s Ready and waiting for data in Azure.
Performance View of On-Prem Servers.
Azure Arc Service Map will come available
Conclusion
With Microsoft Azure Arc Services you get the Azure Cloud Management services connected with On-Premises Servers. You get Azure Security Center, Log Analytics, Azure Monitoring and Alerting, Update Management, Change tracking and Automation tasks. This is the power of Hybrid IT Management and get the best of Tools there is like Windows Admin Center supporting me with Windows Server 20H2 Core. Azure Arc Services with Kubernetes and Azure Stack HCI Management is powerful and with a Single pain of Glass in IT Management. Hope this helpful for you, and Go for it yourself. 😉